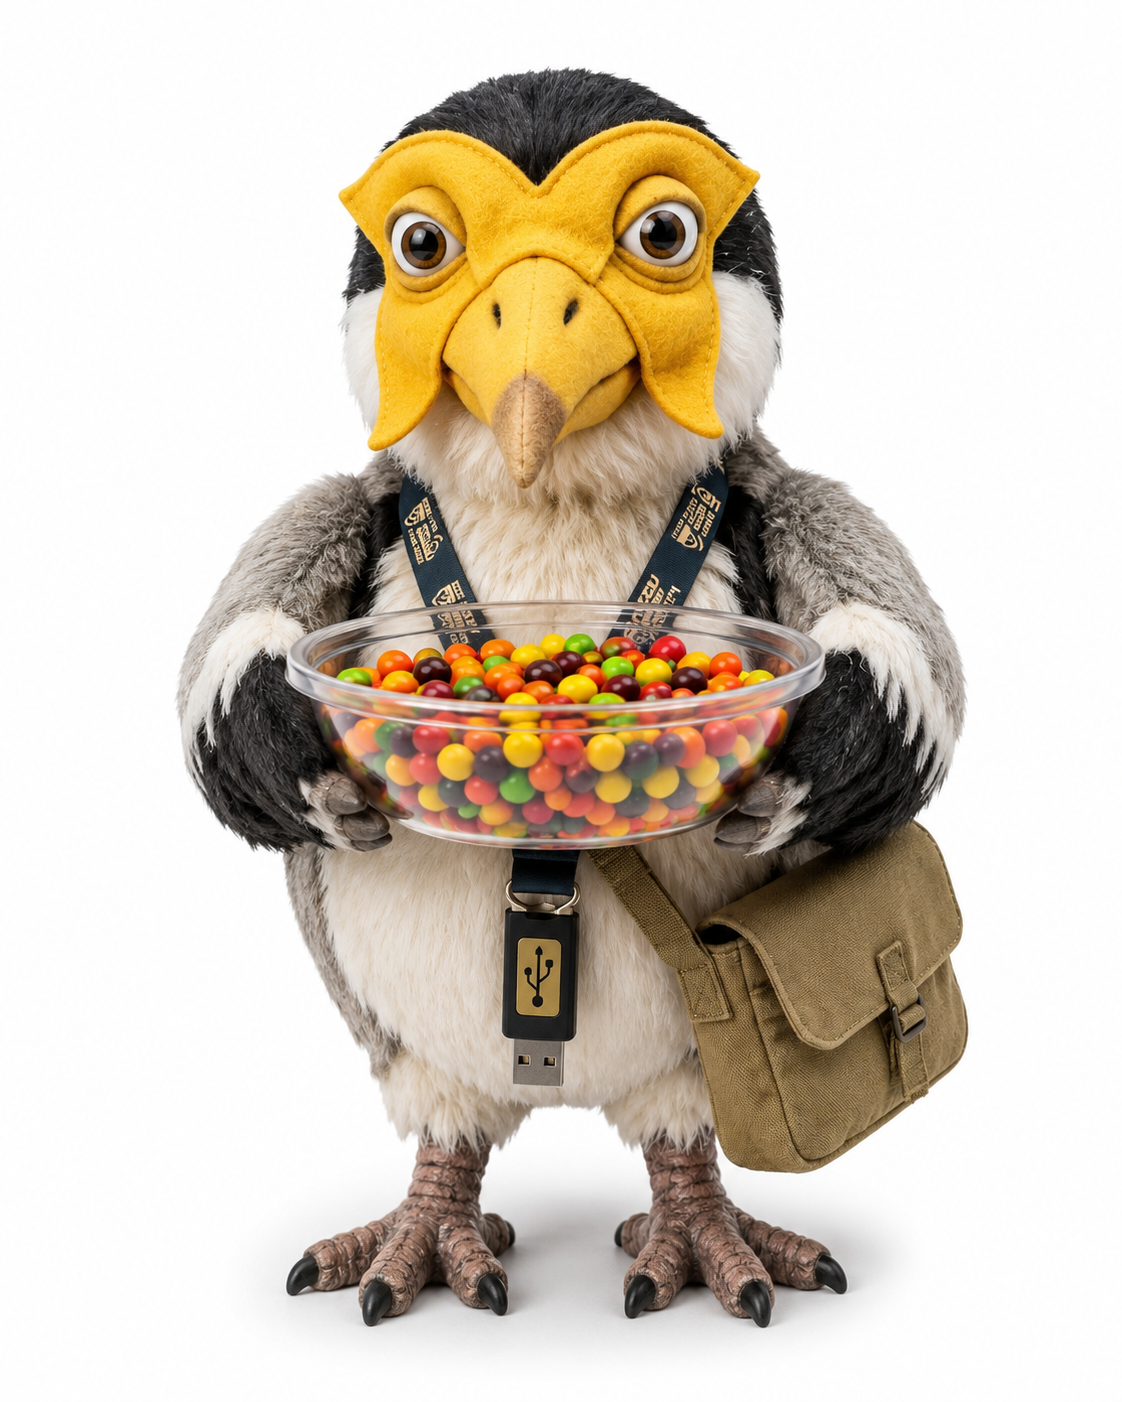
Somewhere between "look at this character" and "I want that on my shelf" sits a real pipeline: two different printing technologies, a genuinely hard step turning a photo into a 3D shape, a size limit almost nobody expects, a material choice with a food-safety catch, and a finishing process that turns a rough plastic part into something you would actually display. This walks through all five, using one real example: a plush toy plover named Plux, and the dream of a 40cm plastic version holding a serving bowl.
Module 01
Two machines, one question
"3D printing" is not one machine. It is two genuinely different manufacturing processes that happen to share a name, and which one suits a job depends on what the job is. Before Plux can become a plastic model, it is worth knowing what the machine at the end of this process actually does.
The character in question
Plux is a soft toy: fabric, stuffing, felt, glass beads for the bowl. The ask is a 40cm solid plastic version of the same character, still holding a bowl, but one sturdy enough to actually serve something from. That single sentence hides most of the interesting problems in this deck: a soft reference object turning into a rigid one, a tabletop-sized toy turning into a print bigger than most printers can manage in one piece, and a display object being asked to also work as tableware.
FDM or resin: click either
Why this deck follows the FDM route
A 40cm model is well outside what a resin printer can do in one piece; resin machines are built for detail at a small scale, typically well under 30cm, and their liquid photopolymer is a skin irritant and respiratory irritant that needs gloves, goggles and real ventilation to handle safely. A large, sturdy, once-off character model is FDM territory: bigger build volumes, no liquid chemicals, and a wide choice of desktop-friendly machines.
Resin toxicity and ventilation guidance from Raise3D, "Resin 3D Printing Safety: Are Resin Printers Toxic," updated 23 April 2025. FDM versus resin mechanisms from Formlabs' comparison guide for stereolithography, DLP and LCD/MSLA resin printing.
So: an FDM printer, melting plastic thread onto a build plate. Now the actual hard part; getting Plux's shape into that machine at all.
Module 02
From a photo to a printable shape
Myth we'll unpick: point an AI tool at a photo and it hands you an accurate 3D model
A 3D printer does not read photographs. It reads a mesh: a surface built from thousands of connected triangles, sealed with no gaps, that a slicer can cut into layers. Getting from "a photo of Plux" to that mesh is where most of the real work lives, and it is the step that decides whether the finished model actually looks like Plux.
Three routes, three very different answers
So, one product photo of Plux: straight into an AI tool, then straight to print?
This is the exact scenario in the brief: a single existing photo, no access to re-photograph the actual toy from every angle.
Not straight to print, no. A single-image AI generator can turn that one photo into a rough starting mesh in minutes, which is genuinely useful as a base to sculpt from. But an independent 2026 hands-on test of one of these tools, feeding it several photos of a real statue, found it produced "creative interpretations rather than accurate models": details invented, proportions guessed, extra or missing features. The raw output also commonly has holes or overlapping surfaces that a slicer will refuse to print, which need repairing in modelling software first.
For a specific character with specific details worth getting right, whether that is Plux's felt mask, the exact lanyard, or the shape of the bowl, the reliable route is still a person sculpting from the photo as reference, the same way a commissioned figurine is normally made. The AI mesh can be a useful starting block for that sculptor rather than a replacement for them. All3DP, "We Tested Meshy 6: Can AI Finally Generate Good 3D Printable Models From Photos?," published 6 March 2026.
Either way, the file has to be watertight
Whoever builds it, hand or AI-assisted, the finished mesh has to be manifold: a fully sealed surface with no gaps, no stray overlapping faces, and a wall thickness the printer can actually extrude. That check happens before slicing, using repair tools built for exactly this problem.
Assume the shape exists and is print-ready. Plux is still 40cm tall. That is where the next problem starts.
Module 03
Why 40cm does not fit on one printer
Desktop 3D printers have a fixed build volume: a box they physically cannot print outside of. Most people picture "the printer" as flexible about size. It is not.
Three real printers, one shared problem
Bambu Lab X1 Carbon
Build volume 256 × 256 × 256 mm
Tallest dimension: 256mm. Plux needs 400mm.
Original Prusa MK4S
Build volume 250 × 210 × 220 mm
Tallest dimension: 220mm. Plux needs 400mm.
Creality K1 Max
Build volume 300 × 300 × 300 mm
Tallest dimension: 300mm, the biggest of the three. Still short of 400mm.
Specifications from each manufacturer's official product pages, accessed 14 August 2026. None of these common desktop machines has a vertical clearance anywhere near 400mm, which is the practical reality behind almost every "can I print this life-size" question.
The standard fix: cut it into pieces on purpose
Step 1Plan the cutsIn modelling software, the digital Plux is sliced into sections along sensible seams, roughly following where a real figurine kit would have joints: perhaps the body, the head, each arm, and the bowl.
Step 2Add keysSmall aligned pins and matching sockets are added at each cut face, with a tiny clearance gap, so the printed pieces can only go back together one correct way.
Step 3Print each section separatelyEvery piece now easily fits inside a 256 to 300mm printer, oriented to minimise overhangs and use less support material.
Step 4Glue, or dowel, and finish the seamsStrong adhesive, sometimes reinforced with a metal rod through the keyed joint, joins the pieces; the seam lines are then filled and sanded away in the finishing pass in Module 05.
Approach described in JLC3DP, "How to Split Large 3D Prints for Better Quality and Assembly," published 7 November 2024, updated 18 October 2025.
What the printer does with each piece
Software called a slicer takes each section's mesh and cuts it into hundreds of thin horizontal layers, writing out exact instructions for the printer: where to move, how much plastic to push out, how hot to run. Where a shape overhangs itself steeply, roughly beyond 45 degrees from vertical, the slicer also generates temporary support structures underneath, snapped off once printing finishes.
Sections planned, sliced, supported. Now: what is it actually printed in?
Module 04
Picking a material for a tray
Myth we'll unpick: "food-safe filament" means the finished tray is safe to serve food from
Plux is not just a display piece; the brief was a model holding a serving bowl. That single detail changes which plastic makes sense, and raises a question most people never think to ask.
Three common choices
Is a 3D-printed bowl actually food safe?
A filament labelled "food safe" is a common sight in hobby shops. Does that label alone settle the question for a tray that will hold lollies or snacks?
No, not by itself. Formlabs' own food-safety guidance states plainly that printed parts are not food safe by default, food-safe or FDA-listed material included. The problem is physical: every FDM layer line is a microscopic groove, and those grooves can trap bacteria that ordinary washing does not reach. Genuine food safety also needs food-grade hardware, such as a stainless-steel rather than brass nozzle, since brass can contain lead.
The usual mitigation is coating the finished piece in a food-grade epoxy or polyurethane sealant to close the layer lines over, and even that comes with a caveat: the same guidance warns a coating "doesn't guarantee food safety for prolonged use," since it can wear through, and may not survive a dishwasher. For a display bowl of wrapped lollies handled occasionally, the practical risk is low; for anything meant for repeated direct food contact, that coating needs to be applied properly and checked over time, not assumed permanent.
Source: Formlabs, "The Essential Guide to Food Safe 3D Printing."
The material call for Plux
For a large, once-off, mostly-decorative figure that will occasionally hold something to eat, PETG is the sensible middle ground: tougher and more heat-resistant than plain PLA, easier to print than ABS, and a reasonable surface for a food-grade epoxy seal over the bowl section specifically.
Material chosen. Now, roughly, what does actually printing and finishing something this size involve?
Module 05
From rough print to finished piece
A print straight off the plate is grey or single-coloured plastic with visible layer lines and support scars. Turning that into something that actually looks like Plux, on a shelf or a table, is its own multi-step job.
The finishing pass
1Remove supportsSnap off the temporary scaffolding and trim what remains with flush cutters or a hobby knife.
2Join the sectionsGlue the keyed pieces from Module 03 together, reinforcing large joints if needed.
3Sand through the gritsCoarse first, around 80 to 150, then medium, then a fine pass, working the visible layer lines down.
4Fill and primeSpot-fill any gaps or seams, then coat in a filler primer, which shows up flaws the bare plastic hides.
5A final fine sandA light pass over the cured primer, then it is ready for colour.
6PaintThin coats built up gradually, matching Plux's actual felt-and-fabric colours rather than the plastic's own.
7SealA clear protective coat over the paint, and, on the bowl section specifically, the food-grade epoxy from Module 04.
Sequence from Makers101, "3D Print Post-Processing Guide: Sanding, Priming & Painting," updated 9 August 2026.
Time and cost, honestly estimated
A large, multi-part figure like this typically runs from several hours to a couple of days of actual print time, and plain filament for an object this size, printed mostly hollow with internal lattice infill rather than solid, is usually in the tens of dollars rather than hundreds. Treat both figures as an illustrative estimate, not a quote; the honest number only comes from slicing the finished model and reading its own time and material report.
Print-time range from 3D Printed Decor, "How Long Does 3D Printing Take?," updated 28 April 2025, which specifically notes large figurines often run into multiple days. Filament pricing from FilamentHub Australia's 2026 pricing guide, roughly AUD $17 to $19 per kilogram for PLA, PETG or ABS.
Why this matters
"Can I print this?" almost always has the same honest answer: yes, but not in one step and not for free. A photo becomes a rough starting mesh, not a finished model; a sculptor's eye is still what makes it actually look like Plux; the object comes off the printer in sections that get joined afterwards; the plastic is chosen for what the object will actually do, not just what it will look like; and the piece that ends up on the shelf has been sanded, primed and painted well after the printer itself stopped moving.
Sources used. Printing technologies: Formlabs, "SLA vs. DLP vs. MSLA vs. LCD: Guide to Resin 3D Printers"; Raise3D, "Resin 3D Printing Safety: Are Resin Printers Toxic," updated 23 April 2025. Photo-to-model pipeline: 3DCentral Solutions, "Custom 3D Printed Figurines: A Complete Guide," published 21 January 2025, updated 29 March 2026; 80.lv, interview with character artist Juan Novelletto on sculpting printable miniatures in ZBrush, 21 October 2024; OpenScan Blog, "Optimizing 3D Scans: How Many Photos Do You Really Need?," 26 March 2025; All3DP, "We Tested Meshy 6: Can AI Finally Generate Good 3D Printable Models From Photos?," 6 March 2026; RapidDirect, "8 Best AI 3D Model Generators in 2026 We Tested & Compared," updated 21 July 2026. Build volumes and splitting: official product pages for the Bambu Lab X1 Carbon, Original Prusa MK4S and Creality K1 Max, accessed 14 August 2026; JLC3DP, "How to Split Large 3D Prints for Better Quality and Assembly," 7 November 2024, updated 18 October 2025. Slicing and supports: Siddament, "What Is a 3D Printer Slicer," 18 May 2026; Raise3D Academy, "When and How to Use 3D Printed Support Structures." Materials and food safety: UnionFab, "ASA vs ABS vs PETG vs PLA," 23 May 2025; Formlabs, "The Essential Guide to Food Safe 3D Printing." Time, cost and finishing: 3D Printed Decor, "How Long Does 3D Printing Take?," updated 28 April 2025; FilamentHub Australia pricing guide, updated 15 June 2026; Makers101, "3D Print Post-Processing Guide," updated 9 August 2026. Deliberately not stated as fact: an exact print time or material cost for this specific model, since no dated source measures an object of this scale directly; both figures in Module 05 are labelled as illustrative for that reason.